Adversarial module
This module aims to provide users several tools to simulate an adversarial attack on a neural network.
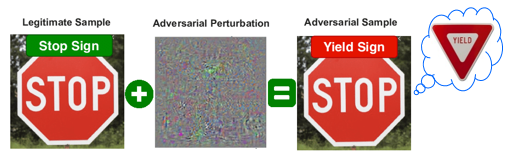
Adversarial attacks can threaten the security of users. They consist in deceiving the network without the user’s knowledge by making imperceptible changes to the input data.
This module give you the possibility to run an adversarial attack, study the consequences of differents attacks and implement your own attacks.
Contents
For the users
Run an adversarial attack
In order to perform an adversarial attack simulation, you will need to add in
the Ini file of your network a new section called [sp.Adversarial].
In this section, you can specify the type of attack you wish to run as well as
some parameters to design your attack.
; Environment
[sp]
SizeX=32
SizeY=32
BatchSize=128

[sp.Adversarial]
Attack=PGD
Eps=0.2
The parameters you can modify are indicated in the following table:
Option [default value] |
Description |
|---|---|
|
Name of the attack (None, Vanilla, GN, FGSM, PGD) |
|
Degradation rate |
|
Number of iterations (if the attack requires several iterations) |
|
If |
|
If |
After specifying the design of the attack, you can run the regular N2D2 options like -test or -learn`.
Therefore, you can test your network against adversarial attacks by running the test option.
$ ./n2d2 ResNet-18-BN.ini -test
Moreover, running a learning with the adversarial module will execute a robust learning.
1st function to study adversarial attacks
This function can allow you to perform an adversarial attack on a single batch.
The function indicates the successful attacks and stores the original and the modified inputs in
the testAdversarial folder.
To perform the function, please run
$ ./n2d2 ResNet-18-BN.ini -dev 0 -testAdv Solo
You should see on your terminal screen
PGD attack
Untargeted mode
BatchPos 0: Successful attack (label: 7, estimated: 9 with 55.54%)
BatchPos 1: Successful attack (label: 3, estimated: 5 with 43.59%)
BatchPos 2: Successful attack (label: 1, estimated: 7 with 53.33%)
BatchPos 3: Successful attack (label: 8, estimated: 2 with 50.92%)
BatchPos 4: Successful attack (label: 5, estimated: 8 with 51.02%)
BatchPos 5: Successful attack (label: 0, estimated: 6 with 50.26%)
BatchPos 6: Successful attack (label: 8, estimated: 3 with 59.07%)
BatchPos 7: Successful attack (label: 7, estimated: 9 with 52.42%)
BatchPos 8: Successful attack (label: 9, estimated: 7 with 62.47%)
BatchPos 9: Successful attack (label: 5, estimated: 0 with 61.88%)
Time elapsed: 6.85 s
2nd function to study adversarial attacks
This function can allow you to perform an adversarial attack on multiple batches (2000 images). The function indicates the ratio of successful attacks. It also provides the ratio of successful attacks for each class.
To perform the function, please run
$ ./n2d2 ResNet-18-BN.ini -dev 0 -testAdv Multi
You should see on your terminal screen
Treating 2000/2000
Analysis of the results...
Successful attacks: 2.20%
including network errors: 1.35%
- successful attacks on class 0: 0.00% (0/218)
- successful attacks on class 1: 0.00% (0/219)
- successful attacks on class 2: 2.78% (6/216)
- successful attacks on class 3: 2.16% (4/185)
- successful attacks on class 4: 1.60% (3/188)
- successful attacks on class 5: 4.89% (9/184)
- successful attacks on class 6: 2.55% (5/196)
- successful attacks on class 7: 3.37% (7/208)
- successful attacks on class 8: 3.66% (7/191)
- successful attacks on class 9: 1.54% (3/195)
Time elapsed: 4.62 s
For the developers
It’s now your turn to implement your own attacks !
To integrate your attack inside N2D2, you will have to change the following files:
include/Adversarial.hppenum Attack_T { None, Vanilla, GN, FGSM, PGD, My_attack <--------------- }; ... namespace { template <> const char* const EnumStrings<N2D2::Adversarial::Attack_T>::data[] = {"None", "Vanilla", "GN", "FGSM", "PGD", "My_attack"}; } ... void FFGSM_attack(std::shared_ptr<DeepNet>& deepNet, const float eps, const float alpha, const bool targeted = false); void PGD_attack(std::shared_ptr<DeepNet>& deepNet, const float eps, const unsigned int nbIter, const float alpha, const bool targeted = false, const bool random_start = false); void My_attack(); <---------------
src/Adversarial.cppin the
attackLauncherfunction, indicate your attack in the switch.case Vanilla: Vanilla_attack(); break; case FGSM: FGSM_attack(deepNet, mEps, mTargeted); break; case My_attack: My_attack(); <--------------- break;
void N2D2::My_attack()
{
    /* My implementation */
}
src/Generator/AdversarialGenerator.cppIf you need to add new parameters, add them in the class Adversarial and don’t forget to save them during the generation of the Adversarial layer. You can implement some setter methods in the
AdversarialGeneratorfile.adv->setEps(iniConfig.getProperty<float>("Eps", adv->getEps())); adv->setNbIterations(iniConfig.getProperty<unsigned int>("NbIterations", adv->getNbIterations())); adv->setRandomStart(iniConfig.getProperty<bool>("RandomStart", adv->getRandomStart())); adv->setTargeted(iniConfig.getProperty<bool>("Targeted", adv->getTargeted())); return adv;