Performing simulations
Minimum system requirements
Supported processors:
ARM Cortex A15 (tested on Tegra K1)
ARM Cortex A53/A57 (tested on Tegra X1)
Pentium-compatible PC (Pentium III, Athlon or more-recent system recommended)
Supported operating systems:
Windows \(\geq\) 7 or Windows Server \(\geq\) 2012, 64 bits with Visual Studio \(\geq\) 2015.2 (2015 Update 2)
GNU/Linux with GCC \(\geq\) 4.4 (tested on RHEL \(\geq\) 6, Debian \(\geq\) 6, Ubuntu \(\geq\) 14.04)
At least 256 MB of RAM (1 GB with GPU/CUDA) for MNIST dataset processing
At least 150 MB available hard disk space + 350 MB for MNIST dataset processing
For CUDA acceleration:
CUDA \(\geq\) 6.5 and CuDNN \(\geq\) 1.0
NVIDIA GPU with CUDA compute capability \(\geq\) 3 (starting from Kepler micro-architecture)
At least 512 MB GPU RAM for MNIST dataset processing
Obtaining N2D2
Prerequisites
Red Hat Enterprise Linux (RHEL) 6
Make sure you have the following packages installed:
cmakegnuplotopencvopencv-devel(may require therhel-x86_64-workstation-optional-6repository channel)
Plus, to be able to use GPU acceleration:
Install the CUDA repository package:
rpm -Uhv http://developer.download.nvidia.com/compute/cuda/repos/rhel6/x86_64/cuda-repo-rhel6-7.5-18.x86_64.rpm
yum clean expire-cache
yum install cuda
Install cuDNN from the NVIDIA website: register to NVIDIA Developer and download the latest version of cuDNN. Simply copy the header and library files from the cuDNN archive to the corresponding directories in the CUDA installation path (by default: /usr/local/cuda/include and /usr/local/cuda/lib64, respectively).
Make sure the CUDA library path (e.g. /usr/local/cuda/lib64) is added to the LD_LIBRARY_PATH environment variable.
Ubuntu
Make sure you have the following packages installed, if they are available on your Ubuntu version:
cmakegnuplotlibopencv-devlibcv-devlibhighgui-dev
Plus, to be able to use GPU acceleration:
Install the CUDA repository package matching your distribution. For example, for Ubuntu 14.04 64 bits:
wget http://developer.download.nvidia.com/compute/cuda/repos/ubuntu!\color{gray}{1404}!/!\color{gray}{x86\_64}!/cuda-repo-ubuntu!\color{gray}{1404}!_7.5-18_!\color{gray}{amd64}!.deb
dpkg -i cuda-repo-ubuntu!\color{gray}{1404}!_7.5-18_!\color{gray}{amd64}!.deb
Install the cuDNN repository package matching your distribution. For example, for Ubuntu 14.04 64 bits:
  wget http://developer.download.nvidia.com/compute/machine-learning/repos/ubuntu!\color{gray}{1404}!/!\color{gray}{x86\_64}!/nvidia-machine-learning-repo-ubuntu!\color{gray}{1404}!_4.0-2_!\color{gray}{amd64}!.deb
  dpkg -i nvidia-machine-learning-repo-ubuntu!\color{gray}{1404}!_4.0-2_!\color{gray}{amd64}!.deb

Note that the cuDNN repository package is provided by NVIDIA for Ubuntu
starting from version 14.04.
Update the package lists:
apt-get updateInstall the CUDA and cuDNN required packages:
apt-get install cuda-core-7-5 cuda-cudart-dev-7-5 cuda-cublas-dev-7-5 cuda-curand-dev-7-5 libcudnn5-dev
Make sure there is a symlink to
/usr/local/cuda:
ln -s /usr/local/cuda-7.5 /usr/local/cuda
Make sure the CUDA library path (e.g. /usr/local/cuda/lib64) is added to the LD_LIBRARY_PATH environment variable.
Windows
On Windows 64 bits, Visual Studio \(\geq\) 2015.2 (2015 Update 2) is required.
Make sure you have the following software installed:
CMake (http://www.cmake.org/): download and run the Windows installer.
dirent.hC++ header (https://github.com/tronkko/dirent): to be put in the Visual Studio include path.Gnuplot (http://www.gnuplot.info/): the bin sub-directory in the install path needs to be added to the Windows
PATHenvironment variable.OpenCV (http://opencv.org/): download the latest 2.x version for Windows and extract it to, for example,
C:\OpenCV\. Make sure to define the environment variableOpenCV_DIRto point toC:\OpenCV\opencv\build. Make sure to add the bin sub-directory (C:\OpenCV\opencv\build\x64\vc12\bin) to the WindowsPATHenvironment variable.
Plus, to be able to use GPU acceleration:
Download and install CUDA toolkit 8.0 located at https://developer.nvidia.com/compute/cuda/8.0/prod/local_installers/cuda_8.0.44_windows-exe:
rename cuda_8.0.44_windows-exe cuda_8.0.44_windows.exe
cuda_8.0.44_windows.exe -s compiler_8.0 cublas_8.0 cublas_dev_8.0 cudart_8.0 curand_8.0 curand_dev_8.0
Update the
PATHenvironment variable:
set PATH=%ProgramFiles%\NVIDIA GPU Computing Toolkit\CUDA\v8.0\bin;%ProgramFiles%\NVIDIA GPU Computing Toolkit\CUDA\v8.0\libnvvp;%PATH%
Download and install cuDNN 8.0 located at http://developer.download.nvidia.com/compute/redist/cudnn/v5.1/cudnn-8.0-windows7-x64-v5.1.zip (the following command assumes that you have 7-Zip installed):
7z x cudnn-8.0-windows7-x64-v5.1.zip
copy cuda\include\*.* ^
  "%ProgramFiles%\NVIDIA GPU Computing Toolkit\CUDA\v8.0\include\"
copy cuda\lib\x64\*.* ^
  "%ProgramFiles%\NVIDIA GPU Computing Toolkit\CUDA\v8.0\lib\x64\"
copy cuda\bin\*.* ^
  "%ProgramFiles%\NVIDIA GPU Computing Toolkit\CUDA\v8.0\bin\"
Getting the sources
Use the following command:
git clone --recursive git@github.com:CEA-LIST/N2D2.git
Note
You need the recursive option to download the pybind11 submodule.
Compilation
To compile the program:
mkdir build
cd build
cmake .. && make
On Windows, you may have to specify the generator, for example:
cmake .. -G"Visual Studio 14"
Then open the newly created N2D2 project in Visual Studio 2015. Select
“Release” for the build target. Right click on ALL_BUILD item and
select “Build”.
Downloading training datasets
A python script located in the repository root directory allows you to select and automatically download some well-known datasets, like MNIST and GTSRB (the script requires Python 2.x with bindings for GTK 2 package):
./tools/install/install_dataset.py
By default, the datasets are downloaded in the path specified in the
N2D2_DATA environment variable, which is the root path used by the
N2D2 tool to locate the databases. If the N2D2_DATA variable is not
set, the default value used is /local/$USER/n2d2_data/ (or
/local/n2d2_data/ if the USER environment variable is not set) on
Linux and C:\n2d2_data\ on Windows.
Please make sure you have write access to the N2D2_DATA path, or if
not set, in the default /local/$USER/n2d2_data/ path.
Run the learning
The following command will run the learning for 600,000 image presentations/steps and log the performances of the network every 10,000 steps:
./n2d2 "mnist24_16c4s2_24c5s2_150_10.ini" -learn 600000 -log 10000
Note: you may want to check the gradient computation using the
-check option. Note that it can be extremely long and can
occasionally fail if the required precision is too high.
Test a learned network
After the learning is completed, this command evaluate the network performances on the test data set:
./n2d2 "mnist24_16c4s2_24c5s2_150_10.ini" -test
Interpreting the results
Recognition rate
The recognition rate and the validation score are reported during the learning in the TargetScore_/Success_validation.png file, as shown in figure [fig:validationScore].
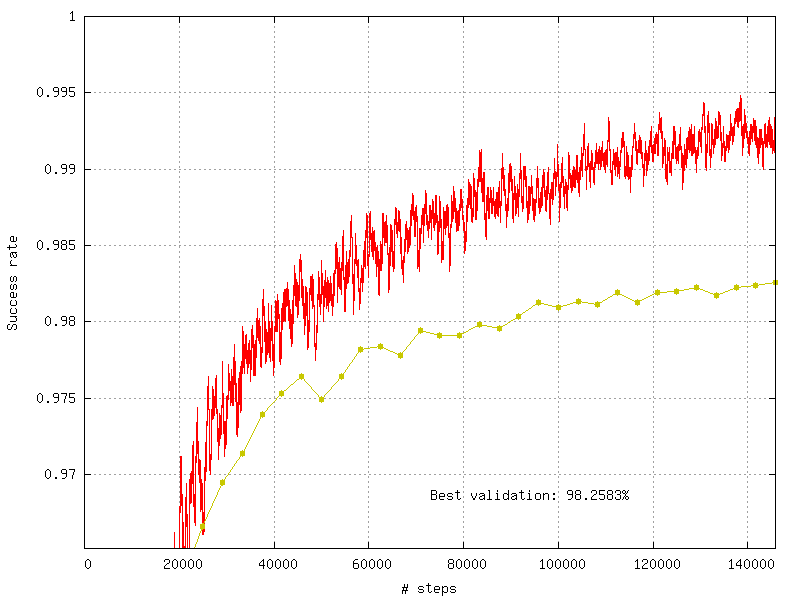
Recognition rate and validation score during learning.
Confusion matrix
The software automatically outputs the confusion matrix during learning, validation and test, with an example shown in figure [fig:ConfusionMatrix]. Each row of the matrix contains the number of occurrences estimated by the network for each label, for all the data corresponding to a single actual, target label. Or equivalently, each column of the matrix contains the number of actual, target label occurrences, corresponding to the same estimated label. Idealy, the matrix should be diagonal, with no occurrence of an estimated label for a different actual label (network mistake).
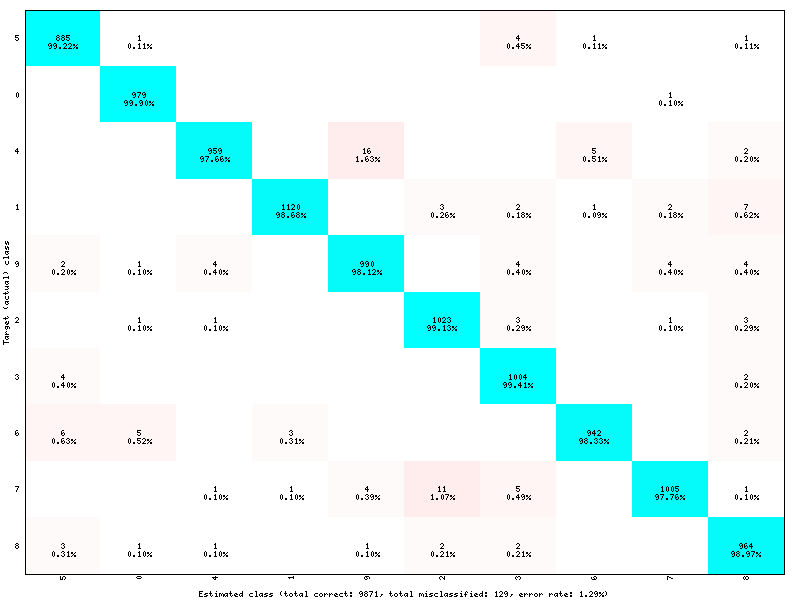
Example of confusion matrix obtained after the learning.
The confusion matrix reports can be found in the simulation directory:
TargetScore_/ConfusionMatrix_learning.png;
TargetScore_/ConfusionMatrix_validation.png;
TargetScore_/ConfusionMatrix_test.png.
Memory and computation requirements
The software also report the memory and computation requirements of the network, as shown in figure [fig:stats]. The corresponding report can be found in the stats sub-directory of the simulation.
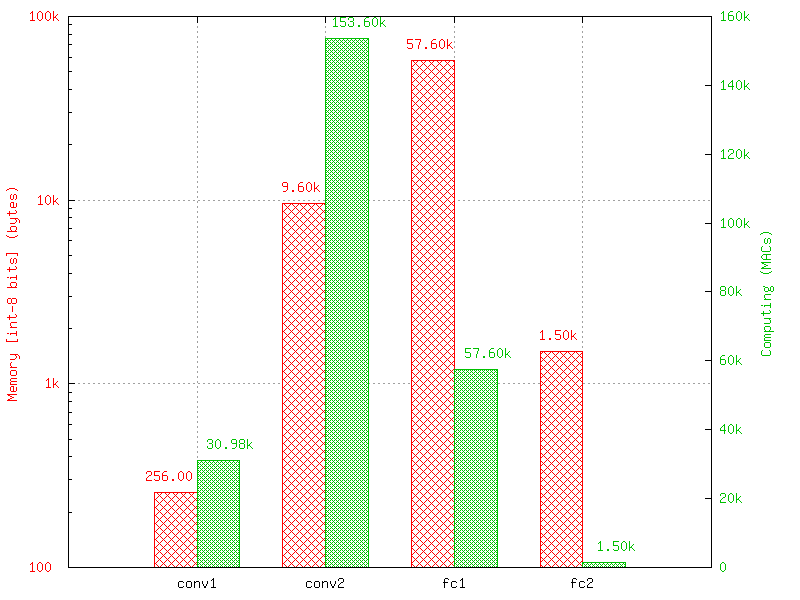
Example of memory and computation requirements of the network.
Kernels and weights distribution
The synaptic weights obtained during and after the learning can be analyzed, in terms of distribution (weights sub-directory of the simulation) or in terms of kernels (kernels sub-directory of the simulation), as shown in [fig:weights].
Output maps activity
The initial output maps activity for each layer can be visualized in the outputs_init sub-directory of the simulation, as shown in figure [fig:outputs].
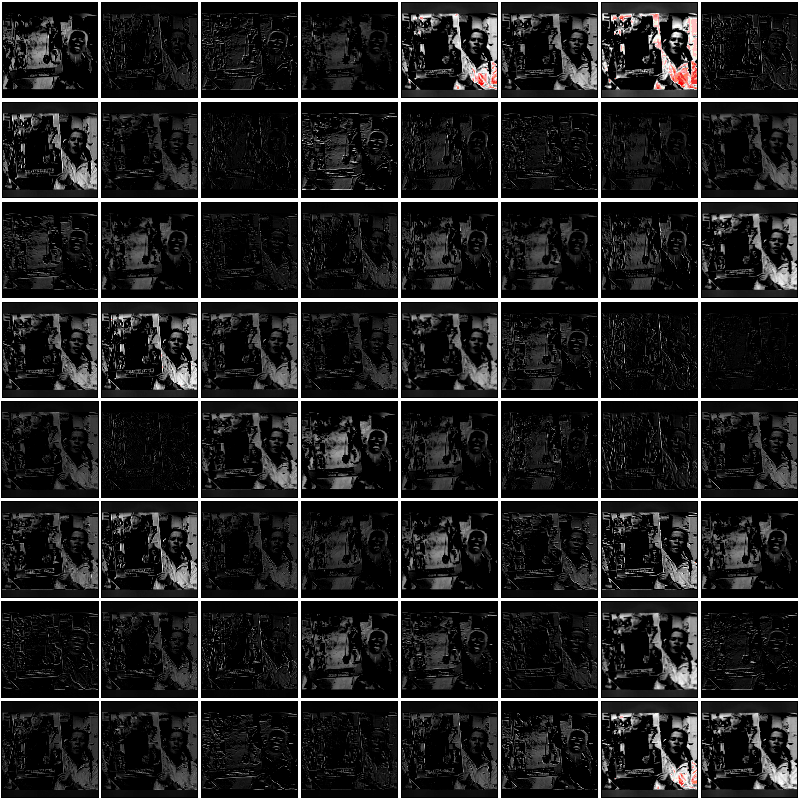
Output maps activity example of the first convolutional layer of the network.